Intro
In today’s digital age, having a flat-screen display mounted on the wall is not just about saving space—it’s about enhancing your viewing experience and adding a sleek look to your living room or office environment. If you’re looking to mount a TV or install a display, it may seem daunting at first, but with the right tools and some patience, it’s definitely an achievable project. Here at Sabercom we specialise in digital signage solutions, so all of our screen installations are in offices, public, and commercial areas. However, this guide is suitable for other types of installation and we’ll walk you through the process step by step, ensuring your new setup is both secure and stylish.
Choosing the Right Wall Mount
Selecting an appropriate wall mount is a pivotal step in the screen installation process. There are primarily three types of mounts to consider. A fixed mount maintains a static position, ensuring a slim profile against the wall, ideal for setups where varied viewing angles are not required. For those who prefer some adjustability, tilting mounts permit the screen to be angled downwards, which is perfect for installations above eye level, reducing glare and enhancing viewing comfort. The most versatile option is the full-motion mount, which allows for extensive manoeuvrability, including pulling the screen away from the wall and angling it in multiple directions, catering to different viewing positions within the room. When choosing your mount, confirm its compatibility with your displays VESA mounting specifications—these are the distance between the mounting holes on the back of the TV. Additionally, ensure the mount can support the weight and dimensions of your screen to guarantee a secure installation.
Gathering Your Tools and Materials
To embark on the process of mounting your telly, ensure you have all the necessary tools and materials at hand. This includes a stud finder to accurately locate the supporting studs within your walls, a drill complemented by a variety of drill bits for creating pilot holes, and a spirit level to guarantee your display screen hangs straight. A pencil and a tape measure are indispensable for precise marking and measuring. You’ll also require a screwdriver, and in some cases, a socket wrench may come in handy for tightening bolts. Crucially, do not overlook the mounting kit provided with your wall mount, which contains essential fixtures such as wall anchors, screws, and brackets. It is advisable to have someone assist you, as an extra pair of hands can significantly simplify the process, particularly when aligning and securing the telly or mount. Gathering these tools and materials before commencing ensures a smooth installation process.
Finding the Perfect Spot and Preparing the Wall
Identifying the optimal placement for your television is a critical step that influences viewing comfort. The ideal height is usually at eye level from your seating position to avoid neck strain, however, when used for digital signage, you may need to consider that your audience might be standing. Use a stud finder to pinpoint the studs, which provide the necessary support for your mount. Mark these locations clearly. Additionally, it’s prudent to verify that the chosen spot is free from internal hazards such as pipes or electrical wiring. A wire detector can be invaluable here, ensuring you don’t drill into hidden obstacles. Once you’ve confirmed the location is safe and marked the studs, clean the area of any dust or debris to prepare for the next steps. This preparation ensures a stable foundation for your TV, contributing to a safe and enjoyable viewing experience.
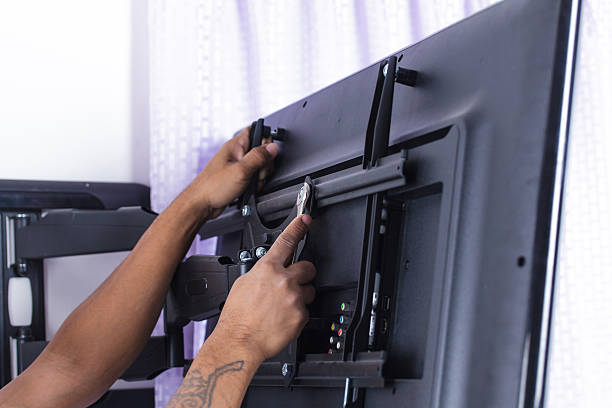
Attaching the Bracket to the TV
Firstly, place your display gently onto a clean, soft surface to prevent any damage to the screen. Identify the mounting holes situated at the rear of the TV. These holes are designed for attaching the bracket, aligning with the VESA specifications mentioned previously. Proceed by aligning the bracket with these holes, ensuring it’s in the correct orientation. The mounting kit that accompanies your wall mount will include screws suitable for this purpose. Begin by loosely fitting each screw into the designated holes on the bracket to attach it to the TV. Once all screws are in place, check that the bracket is positioned correctly and evenly across the back of the television. Following this verification, securely tighten the screws to affix the bracket firmly in place, taking care not to over-tighten and risk damaging the TV. This step is crucial for ensuring the safety and stability of your television once mounted on the wall.
Installing the Wall Plate
Upon confirming the studs’ locations, it’s time to position the wall plate. Utilising your spirit level, ensure the plate is precisely level before proceeding to mark the locations of the drill holes through the plate’s openings. Temporarily remove the plate to drill pilot holes directly into the studs; should your wall necessitate wall anchors for added stability, gently tap these into place at this stage. Realign the wall plate against the wall, matching up with your pilot holes, then securely fasten it using the screws provided in your mounting kit. It’s imperative that these screws are tightened adequately, ensuring the wall plate is immovably attached to the wall, ready to safely support the weight of your television. This step is fundamental in guaranteeing the overall stability and safety of your TV mounting endeavour, laying a robust foundation for the subsequent phases of installation.
Hanging the TV on the Wall
With the preparatory steps completed, the moment has arrived to elevate your display to its new position on the wall. Enlist the assistance of a second person for this critical stage, as handling the television alone could pose a risk to both your safety and the device. Align the display so that the bracket affixed to its rear slots seamlessly into the counterpart on the wall plate. This action requires care and precision to avoid damaging the bracket system or the display screen. Depending on the design of your chosen mount, this step might necessitate the use of additional securing measures. These can include locking screws or a retention clip, which are paramount in anchoring the telly firmly against the wall, preventing any accidental displacement. Engage these security features as per the manufacturer’s instructions to ensure a robust installation. Once positioned, take a moment to ensure the TV is correctly aligned and securely attached, paving the way for the final stages of your installation project.
Managing Cables for a Clean Look
Achieving a streamlined and clutter-free appearance necessitates meticulous cable management. There are a variety of options available to conceal and organise your cables effectively. One such method involves utilising in-wall cable routing systems, which, although more labour-intensive to install, offer an exceptionally discreet solution. Alternatively, for a simpler approach, cable clips or sleeves can be employed to gather and guide cables neatly along the wall. These accessories not only help in maintaining an organised aesthetic but also protect the cables from wear and tear. Before tidying the cables, ensure all necessary connections have been made and that every device is functioning as expected. This pre-emptive step prevents the need to disturb your neatly arranged cables for troubleshooting later on. Implementing these cable management strategies significantly contributes to the overall neatness of your installation, enhancing the visual appeal of your mounted TV or display.
Final Touches and Safety Checks
Upon completion of your TV mounting endeavour, it’s essential to perform a thorough inspection to ensure everything is in perfect order. Start by meticulously checking each connection to confirm that all components are properly engaged and functioning as intended. This includes a careful examination of the screws and brackets to ensure they are tightly secured, eliminating any potential hazards that could lead to the TV becoming dislodged. If your mount allows for adjustment, gently tweak the positioning of the television to optimise viewing angles and enhance your viewing experience. It’s advisable to gently apply pressure to the mounted TV to test for any unwanted movement or instability, which could indicate the need for further securing. This final evaluative step is crucial for peace of mind, guaranteeing that your installation is not only visually pleasing but also steadfast and safe for all who enjoy it.
If you’re looking to install digital screens around your organisation and don’t have the in-house know how, contact Sabercom. In addition to displays and installation, we can provide you with a digital signage content management system to schedule content for communicating with employees or upselling to potential customers.